
The $150 Challenge: What We’re Building and Why
Series: Building a SQL Server Always On Lab in Azure
Before You Begin
This is the first post in the series. There are no prerequisites beyond an active Azure subscription with the Visual Studio credit activated. If you haven’t done that yet, the next post covers it as its first step.
Who Is This Series For
I’m a DBA with about ten years of experience. I feel like know SQL Server inside and out. Whether it is execution plans, AG internals, backup strategies, or something in between, I feel comfortable with all of it. What I’ve been less confident about is a lot of what surrounds SQL Server. It could be the networking, the Windows configuration, or the Active Directory setup that the sysadmin team always handled while I waited for a server to be handed to me.
This series is my attempt to understand the full picture by building it myself, from scratch, in Azure and writing down everything I learn along the way.
If you’re a DBA, this will hopefully teach you enough Windows administration and Azure networking to stop feeling like a passenger when infrastructure conversations happen. If you’re a sysadmin, the SQL Server sections will explain why DBAs make the configuration requests they do, not just what those requests are. If you’re on the security side of things, the series tries to make a point to call out every decision that has a security implication and explains the reasoning, not just the steps.
My goal is for anyone in a tech background to be able to do this just like me, I try not to assume you’ve done any of this before and explain everything.
So What Are We Building
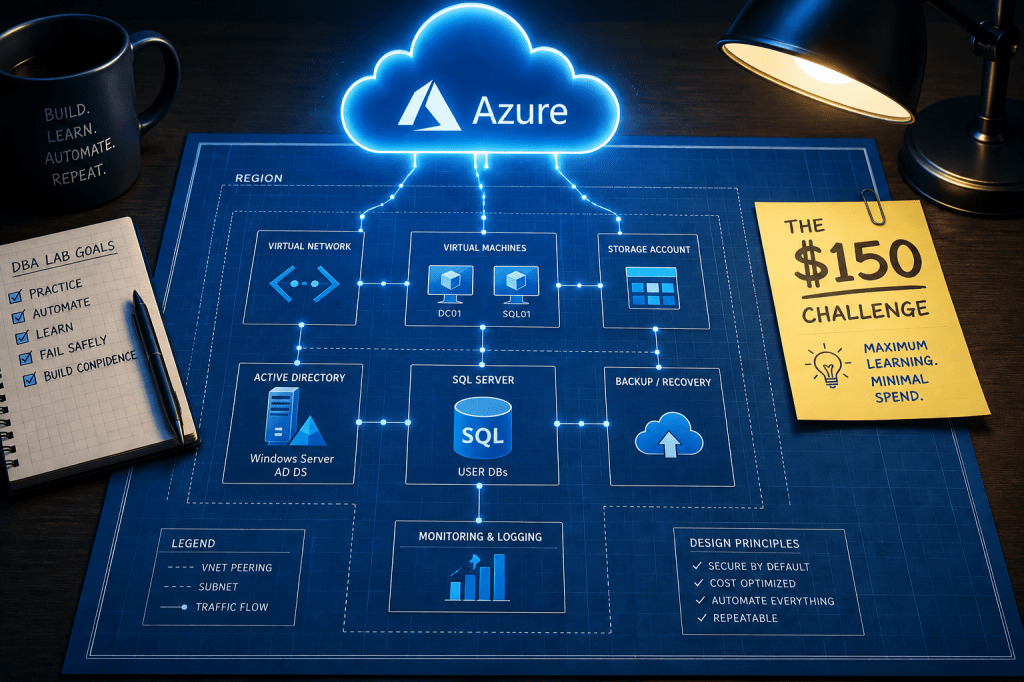
By the end of this series, we’ll have a Management/Monitoring server and a fully functional SQL Server Always On Availability Group running in Azure, built on a real domain, with proper networking, service accounts, and backups. The environment will look like this:
| Machine | Role | Size | Private IP |
| JUMPBOX01 | Management/Monitoring Server | B2s | 10.10.0.4 |
| DC01 | Domain Controller and file share witness | B2s | 10.10.1.4 |
| SQL01 | SQL Server Primary | D2s_v3 | 10.10.2.4 |
| SQL02 | SQL Server Secondary | D2s_v3 | 10.10.2.5 |
All four machines live inside a single Azure Virtual Network (vnet-pcsql-lab-eus-001, 10.10.0.0/16) in East US, divided into dedicated subnets by role. The only machine with a public IP is JUMPBOX01, and that IP is locked to your home IP address via a Network Security Group. Everything else is completely private.
The domain is procuresql.local. The company in all examples is Procure SQL.
The SQL nodes will be members of a Windows Server Failover Cluster (SQLCluster01) with DC01 providing the third vote via a file share witness at \\DC01\SQLWitness. The Availability Group and listener will follow the naming pattern we’ve established for the series, but we’ll get to that later in this page.
Backups go to Azure Blob Storage. Service accounts are Group Managed Service Accounts. No plaintext passwords in scripts, anywhere.
Why Azure? Why $150?
The Visual Studio subscription credit gives you $150 per month in Azure resources. It resets monthly, it doesn’t roll over, and if you go over the limit Azure will suspend your subscription rather than charge you, which makes it a hard ceiling that forces you to actually think about cost, which is a valuable skill in itself.
Here’s what this environment costs assuming 9 hours of uptime per day (8am to 5pm), 22 working days a month, with auto-shutdown handling the rest. If you don’t use it the entire work day and/or if you don’t use it every work day, these estimated costs will be lower.
| Resource | Notes | Est Monthly Cost |
| JUMPBOX01 – B2s | 9hrs/day × 22 days @ $0.042/hr | $8 |
| DC01 – B2s | 9hrs/day × 22 days @ $0.042/hr | $8 |
| SQL01 – D2s_v3 | 9hrs/day × 22 days @ $0.188/hr | $37 |
| SQL02 – D2s_v3 | 9hrs/day × 22 days @ $0.188/hr | $37 |
| OS Disks (x4 Standard SSD) | Disks are billed at rest, this covers each VM’s C drive | $8 |
| SQL Data Disks (x2 Premium SSD P10) | One per SQL AG Node | $10 |
| SQL Log Disks (x2 Premium SSD P10) | One per SQL AG Node | $10 |
| Blob Storage for backups | 50GB of Azure Locally Redundant Storage (LRS) | $3 |
| Internal Load Balancer and Public IP | ILB for the AG Listener, Static Public IP for JUMPBOX01 | $7 |
| Key Vault, VNet, NSGs | Free Tier | $0 |
| Total | $138 |
A note on the SQL disks: unlike a traditional active/passive failover cluster where the storage floats between nodes, an Always On AG keeps a completely independent copy of every database on each replica. SQL01 and SQL02 each need their own data disk and their own log disk.
The $12 of headroom is tighter than it looks. Disks are billed whether the VM is running or not, so the ~$28 in disk costs hits every month regardless of how disciplined you are with uptime. The budget alert we’ll set in the next post will warn you at $140, so at $138 estimated, a few extra hours of VM uptime in a given month is genuinely enough to clip the ceiling. Which brings me to the final note on cost.
Auto-shutdown is non-negotiable here. A single D2s_v3 left running 24/7 for a full month costs around $137 by itself. Two of them running wide open and you’ve blown the budget before you’ve touched a SQL setting. We’ll configure auto-shutdown on every VM at deploy time, not as an afterthought.
How The Series Is Structured
I am trying to break this down so that each post covers a single topic. Every post follows the same structure:
- Why we’re doing this – the reasoning behind the decision, not just the steps
- How to do it – step by step, with individual commands and code blocks inline as you read
- How to verify it worked – because “it didn’t throw an error” is not a test
Throughout each post, individual steps are broken into small code blocks so you read what you’re about to do, do that one thing, and then move on. At the end of every post is a consolidated PowerShell script that runs everything from that post in one shot, which I always found to be useful once you’ve read through it once and understand what it’s doing.
Posts reference each other. If something was set up in an earlier post, you’ll see a link like “we set the static IPs back in post 6” so you can jump back if you need a refresher without the current post re-explaining it.
If you’re following along from the beginning, each post’s testing section produces a state that the next post assumes. If something breaks, the testing sections are your breadcrumb trail back to where things went sideways.
Some Additional Notes
Naming Conventions
I have a naming convention for things that works for me, it might not work for you. But if you want to try to follow it, every resource in this series follows this one. This table is your reference for the entire series.
| Thing | Convention | Example |
| Servers | ALLCAPS## | SQL01, DC01, JUMPBOX01 |
| Domain (FQDN) | procuresql.local | |
| NetBIOS | PROCURESQL | |
| Databases | PascalCase | HRSystem, WidgetTracker |
| AG name | AppNameAG (max 14 characters) | HRSystemAG |
| AG listener | AppNameAGL (max 15 characters) | HRSystemAGL |
| Cluster | SQLCluster01 | |
| File Share Witness | \\DC01\SQLWitness | |
| Service Accounts | svc_ServiceName (gMSA) | svc_SQLEngine$, svc_SQLAgent$ |
| Resource Group | rg-{workload}-{env} | rg-pcsql-lab |
| VNet | vnet-{workload}-{env}-{region}-{instance} | vnet-pcsql-lab-eus-001 |
| Subnets | snet-{role}-{env}-{instance} | snet-mgmt-lab-001 |
| Storage Accounts | st{type}{workload}{env}{instance} | stblobbackuplab001 |
| Network Security Groups | nsg-{subnet}-{env}-{instance} | nsg-mgmt-lab-001 |
Why A File Share Witness Instead Of A Cloud Witness
This comes up quickly when you start reading about Windows Server Failover Clustering in Azure. Microsoft’s own documentation often defaults to Azure Blob Storage as the cluster quorum witness, and it works fine. We’re doing something slightly different: using DC01 as a file share witness instead.
There are two reasons. First, we have a domain controller, so we have a third machine that can serve as the tiebreaker vote without adding cost. This also gives you insight into how a typical on prem setup would work. Second and more importantly for this series, understanding why WSFC needs a third vote, and how a file share witness actually provides it, teaches you more about quorum mechanics than pointing a script at a blob container does. The manual approach here is intentional.
What’s Next
Post 2 will be Subscription Setup & Cost Guardrails is where we start actually touching Azure. We’ll activate the Visual Studio credit, create the resource group, set up budget alerts, and configure the auto-shutdown policy that keeps us inside the $150 ceiling for the rest of the series.

Query Store 101
Today I heard a great analogy, and it inspired this post. Execution plans are like flight plans, there are multiple flight paths that can be taken to get from where you are to your ultimate destination. Some plans are more efficient than others, and we want to use those whenever possible. How can I make sure I am using the plan I want to use? Let’s talk about air traffic control, the Query Store.
What is the Query Store?
Starting in SQL Server 2016, Query Store is a native tool that tracks query execution data including execution statistics and execution plans. It provides graphical views in SSMS and dynamic management views to assist in identifying problem queries.
Reasons to give it a try?
- Knowing what queries are the most expensive
- Seeing all query executions and whether or not they have regressed based on code changes
- Ability to force specific plans for problem queries
Turning it on is a no brainer for many environments, but if your workload is mostly ad hoc you may not see the same benefit as environments that focus more on stored procedure execution
Getting Started
Installation
Since this is a database level setting and not a server level setting, you will have to perform these actions on each database to enable the Query Store. After the initial work to get this enabled, you do have the option to enable it on the model system database and every new database that gets created will also get this setting enabled so you don’t have to worry about doing it later. There are two ways to get Query Store enabled in your environment.
The fastest way to get this enabled on a long list of databases would be to use T-SQL or PowerShell. For PowerShell, I highly recommend utilizing dbatools.io. It’s free and full of amazing documentation.
ALTER DATABASE [StackOverflow2010] SET QUERY_STORE = ON;
ALTER DATABASE [StackOverflow2013] SET QUERY_STORE = ON; 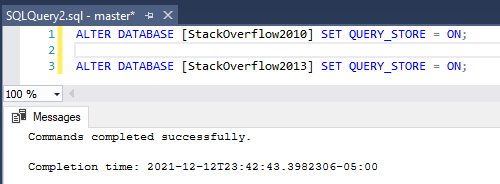
Set-DbaDbQueryStoreOption -SqlInstance ServerA -Database StackOverflow2010, StackOverflow2013 -State ReadWrite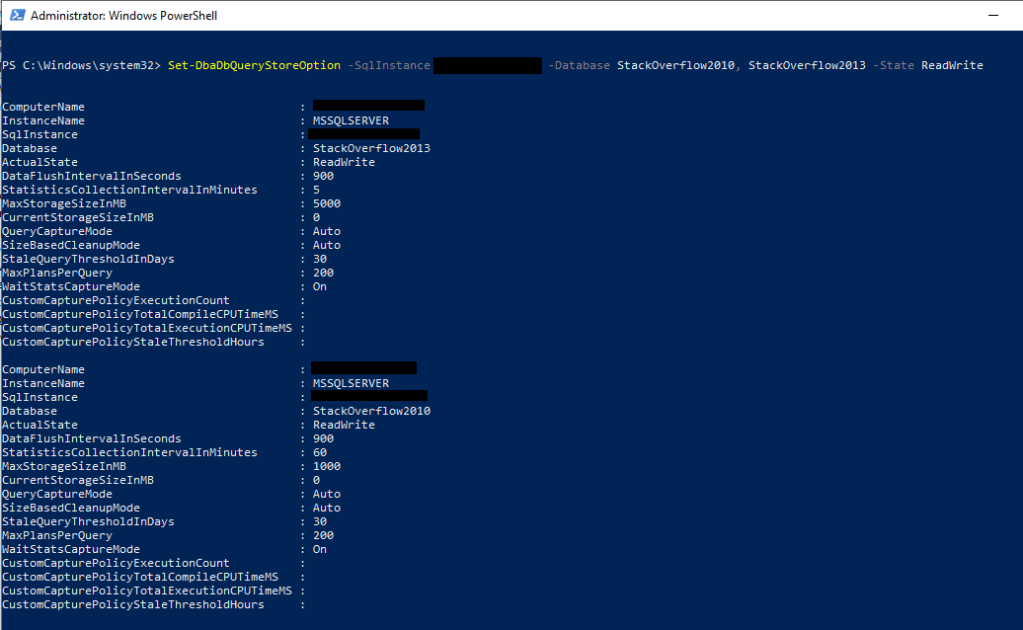
You can also use the user interface to enable this feature. Right click the database and then open the properties. From here, change the operation mode from off to read write. We will go over additional settings to consider in the section below that can also be updated in this view.

Settings to Consider
To implement any of the below settings, you can use the UI like the screenshot above, dbatools for PowerShell, or T-SQL (which I will include below)
Max Size is exactly what it sounds like, a limit to how large you want your query store to grow. Most of the settings below will affect how much space is required, but a good default to work from would be 1GB, adjusting based on the below settings. If the query store runs out of space, it will go from read write to read only and stop gathering query metrics.
Data Flush Interval is used to control how often Query Store goes from memory and gets persisted to disk. When considering this setting, think about how much data you are willing to lose from query store if you have a DR situation arise.
Statistics Collection Interval decides how often to collect metrics. The more often you collect affects how much space you need, but also provides greater levels of granularity when looking into issues in the environment.
Stale Query Threshold controls how often to clean up old data and inactive queries. This setting directly impacts how much space is required for query store.
Query Store Capture Mode determines what queries are captured in query store. Typically this is set to All if you want to capture every query or to Auto if you are ok with SQL ignoring insignificant queries based on execution counts, compile and run times.
Well it’s on, now what?
Stay tuned for additional blogs in my Query Store series to cover basic built in reporting, using query store to assist in tuning, and more advanced features!

QUOTED_IDENTIFIER Set Incorrectly?!
So What Is Going On?
I recently ran into an issue when I set up a job to collect information from an extended event. I wanted to write that to a table in my scratch DBA database. This allowed the customer and I to slice and dice data with ease. This seemed easy enough. I am no stranger to creating these tables and pushing information to them via SQL Server Agent jobs. My job was failing though with the error below saying I have the incorrect SET option for QUOTED_IDENTIFIER.

Backing Up A Step, What Is QUOTED_IDENTIFIER?
Set to ON by default, QUOTED_IDENTIFIER allows use any word as an object identifier so long as it is delimited by quotes (“) or brackets ([]). If set to OFF, restricted keywords can’t be used as an identifier (such as name, description, etc). There are a few cases where you need to have QUOTED_IDENTIFIER set to ON, but the one we are going to focus on for this blog is “SET QUOTED_IDENTIFIER must be ON when you invoke XML data type methods.” Extended event data is stored in XEL files (which is just a variant of XML), so QUOTED_IDENTIFIER must be set to ON.
Back To The Investigation!
So the setting is ON by default but best to not assume, I’d hate to make an ASS out of U and ME. There are a couple ways to check to make sure your setting is on for your target table. The easiest way to find out is right clicking the table and going to the properties. You will see the SET options under the Options section. You can also script the table to see the SET option for QUOTED_IDENTIFIER.

The configuration is correct, but we still receive the same error. I tried dropping and recreating the table a couple of times but it didn’t fix the issue. In a swing for the fences effort, I tried to explicitly call out the SET operation. Different articles in my research called it out before statements as they wanted to show examples of using the setting. I set QUOTED_IDENTIFIER to ON in-line on the SQL Server Agent job code right below table creation and setting variables but before the INSERT statement. The below code would allow you to create a table if it doesn’t exist, delete data that is older than 30 days, and insert new items into the table.
IF NOT EXISTS (SELECT 1 FROM DBA_Admin.sys.objects WHERE name = 'TestTable')
BEGIN
	CREATE TABLE DBA_Admin.dbo.TestTable
	(
		[ts] [datetime],
		[event_name] [nvarchar](256),
		[username] [nvarchar](1000),
		[client_hostname] [nvarchar](1000),
		[client_app_name] [nvarchar](1000),
		[database_name] [nvarchar](300),
		[sql] [nvarchar](max)
	)
END

select min(ts), max(ts) from DBA_Admin.dbo.TestTable

DELETE FROM DBA_Admin.dbo.TestTable
WHERE ts < DATEADD(day,-30,GETDATE())

DECLARE @MaxDate DATETIME

SELECT @MaxDate = MAX(ts)
FROM DBA_Admin.dbo.TestTable

SELECT CAST(event_data as xml) AS event_data
INTO #cte
FROM sys.fn_xe_file_target_read_file('ExtendedEventName*.xel', null, null, null)

SET QUOTED_IDENTIFIER ON

INSERT INTO DBA_Admin.dbo.TestTable
SELECT ts = event_data.value(N'(event/@timestamp)[1]', N'datetime')
	,event_name  = event_data.value(N'(event/@name)[1]', N'nvarchar(256)')
	,[username] = event_data.value(N'(event/action[@name="username"]/value)[1]', N'nvarchar(1000)')
	,[client_hostname] = event_data.value(N'(event/action[@name="client_hostname"]/value)[1]', N'nvarchar(1000)')
	,[client_app_name] = event_data.value(N'(event/action[@name="client_app_name"]/value)[1]', N'nvarchar(1000)')
	,[database_name] = event_data.value(N'(event/action[@name="database_name"]/value)[1]', N'nvarchar(300)')
	,[sql] =
		CASE
			WHEN event_data.value(N'(event/data[@name="statement"]/value)[1]', N'nvarchar(max)') IS NULL
				THEN event_data.value(N'(event/data[@name="batch_text"]/value)[1]', N'nvarchar(max)')
			ELSE event_data.value(N'(event/data[@name="statement"]/value)[1]', N'nvarchar(max)')
		END
FROM #cte
	CROSS APPLY #cte.event_data.nodes(N'/event') AS x(ed)
WHERE event_data.value(N'(event/@timestamp)[1]', N'datetime') > @MaxDate
Conclusion
This issue was a testament to not giving up on difficult troubleshooting. You need to dot all of the I’s and cross all T’s and not throw away an idea before trying it. I could not find an article anywhere where someone had my exact problem. Every article was showing things at a more basic level of someone having the setting OFF instead of ON. I hope this helps someone else and saves them the hours of a headache! If you have questions or even an explanation for why I experienced this issue, I would love to hear from you!

Tuning Basics – Updating an Update
You are out doing your scheduled sweeps of the environment and you notice a huge I/O consumer is one of your update procedures. Your initial thought may be to panic because how can you test data that is changing? You have several methods to tuning queries that adjust data that allow data to revert between tests.
NOTE: We always recommend tuning queries in non-production until we have our final tested solution to implement in production.
Tuning with Rollback Transaction
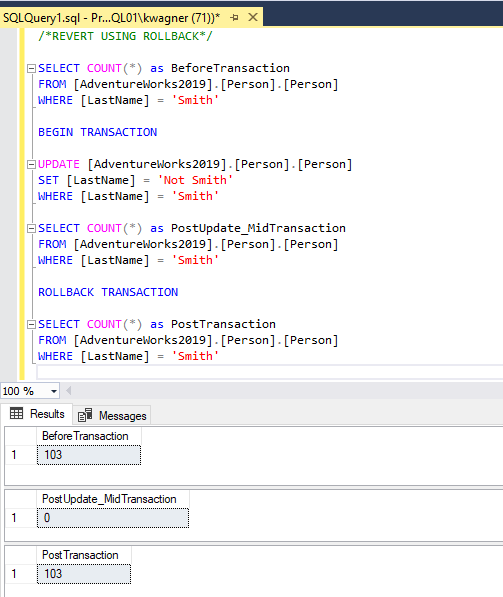
One of the more basic methods for executing queries without changing data is to wrap the statements are you running in a BEGIN TRANSACTION and ROLLBACK TRANSACTION. This allows everything to execute and give you the performance statistics you are looking for, while leaving the data intact to allow for repeat testing.
Tuning using Database Backups
You have a couple options with your standard SQL Server backups to assist in reverting changes made to the testing environment and the same concepts are applied to your basic DR strategy. If the test is short, you can take a full backup before making a change and restore that backup to restart a test.

If you are making a series of changes over a period of time and don’t want to completely restart your test, you can utilize point in time recovery. Once your database is in full recovery, you can start with a full backup and take log backups at set intervals or before different pieces of your change. This allows you to restore to a specific point in your test.

Tuning Database Snapshot
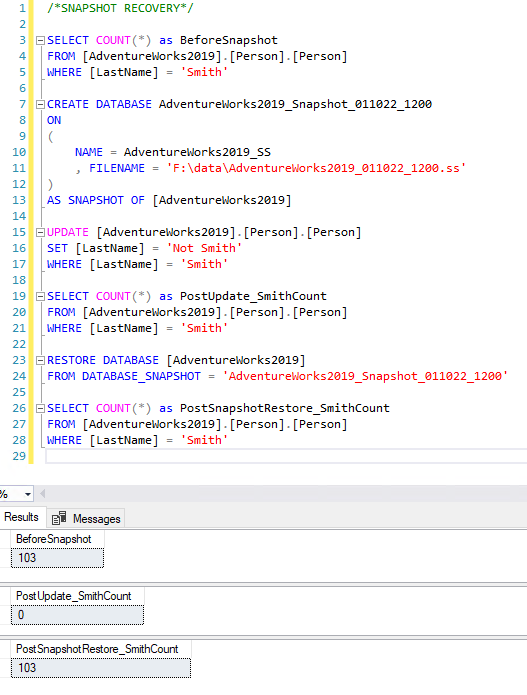
Database Snapshots are a great way to quickly revert large databases to an initial state. Database Snapshots keep a record of database pages as they change and the copy of the page so those extents can be reverted instead of restoring the whole database. Therefore, they require the associated source database as it is not a full copy of the database. Snapshots contain the original version of files of the source database and a pointer file that shows the changes since the snapshot was taken, called a sparse file. The source database must be available for snapshots to be usable. This makes them not an ideal DR solution, but great for analysis in auditing and in tuning situations.
Summary
There are many ways to quickly get back to your original state to allow for quick repetitive testing for queries that change data. A huge benefit of the methods I listed today allow you to also document where transactions and backups occur so you can open a .sql file and have all the needed steps in one document. Do you like other ways to revert changes? Maybe temporal tables? I’d be happy to cover that in a post in the near future. Tell me all about your methods in the comments below!

Accelerated Database Recovery
How did we get here?

There are many ways that a database can crash and need to recover. Maybe you find yourself here from something more severe like hardware failure, perhaps it was only a reboot and when things started to come back you see databases stuck in an “In Recovery” state. I personally have been bitten by a log running transaction rolling back a few times. Regardless, the scenario is scary because you need to wait for the recovery process to finish or restore from back ups to get out of this situation.
Recovery happens in 3 phases in SQL Server.
Analysis Phase
SQL Server is taking a minute to go through the database files to determine what, if anything, needs to be fixed. It will go through the mdf and ldf files, create some working tables (Dirty Page Table and Active Transaction Table) for itself to track what needs done and go forward from there.
Redo Phase
SQL Server is going through and applying every valid modification tracked in the transaction log file/s (how many files needed would be shown in the DPT (Dirty Page Table) as the minimum LSN required). This process is cleaning out the DPT so that all dirty pages that belong to a committed transaction are being applied to disk. In my experience this part takes the longest, but that heavily depends on your transaction log size and number of VLFs.
Undo Phase
Anything that was uncommitted and put into the ATT (Active Transaction Table) is now being reviewed and rolled back so long as it doesn’t affect database integrity. Once these items are rolled back, the database would enter the online state again and become available for reads and writes.
What’s so great about Accelerated Database Recovery?

What if I told you that long running transaction wait times could be eliminated and we could still process the 3 phases of recovery, but at a much faster pace? That is the high level benefit of ADR. ADR brings us the sLog, persisted version store (PVS), and logical reverts. sLog tracks non-versioned operations in memory and the latter 2 phases of the recovery process use this log to process things from the oldest uncommitted transaction up to the latest checkpoint. Since everything is in memory and we are only concerned with non-versioned operations (DDL operations, bulk queries), these steps can process at a much quicker pace. PVS is similar to the version store but gets stored in the target database of the transaction instead of inside tempdb, which helps out the other new concept of logical revert. Logical revert is using PVS to avoid lengthy rollback wait time and locks and instead aborting the transaction all together and just using the previous row version in PVS.
The new 3 phases in SQL Server
Analysis Phase
SQL Server still processes this phase in the same manner it did before, but adds in the step of constructing the sLog for processing in the next 2 steps.
Redo Phase
This phase is now broken into 2 parts
Part 1
We complete our redo transactions required in the sLog starting at the oldest uncommitted transaction and go up to the latest database checkpoint. This part typically completes very quickly because we are still only looing at non-versioned operations.
Part 2
After reaching the latest database checkpoint, the engine then swaps over to the transaction log and continues performing redo transactions until it gets to the current time in the log.
Undo Phase
The undo phase is the big winner in ADR as everything done in undo can happen from the sLog and also perform quick rollbacks using the PVS and logical revert functionality.
Things to watch out for when using Accelerated Database Recovery
While ADR does have many positives, there are some costs associated to them. The largest cost is the increase in size for all data files for databases that have this feature enabled as you are now storing previous versions of changed rows in the user database. Another cost to consider is the additional compute power that will be consumed maintaining the rows in PVS.


